can't sit still...must cook


Search This Blog

Wednesday, April 14, 2010

Artichokes for the Folks

Maybe it's because I moved five blocks from Artichoke Pizza, or because I discovered Trader Joe's life-changing Spinach-Artichoke dip or because its spring.... Whatever the reason, I've been totally crazy for artichokes, ordering them as pizza toppings, putting them on salads or just eating them right out of the jar.

Yes, the jar... I've always assumed working with fresh artichokes would be something like wrestling a cactus.


Tonight I turned over a new leaf and tackled the prickly plant discovering they really are quite easy to handle!

I was home in Connecticut, where cooking is always a treat because I have more than 10 sq. ft. of kitchen space. My dad is also turning over a new leaf and retiring so I thought I would make him and my mom a special meal.

I nominated my Dad as my "blog-ographer," with his new found time and fancy new camera.

I call this dish....

Artichokes for the Folks


Essentially it's Mark Bittman's (New York Times) recipe for Artichokes Provencal but I added shrimp to make it more of a main course.

What you need:
  • a couple tablespoons of extra virgin olive oil (enough to coat the bottom of a large pan)
  • 4 cloves garlic, crushed, then peeled
  • fresh herbs - I used thyme for garnish (optional)
  • 1/2 cup good black olives, pitted (I actually hate olives, there are no "good" olives in my book...I must have been possessed when I chose this recipe)
  • Salt
  • 12 baby artichokes (small artichokes are MUCH easier to work with!)
  • 1 pint grape or cherry tomatoes tomatoes, halved or left whole (I left mine whole)
  • 12-16 uncooked shrimp can be frozen or fresh, peeled or unpeeled
  • a large pan with a lid


My "mise en place," or everything in place to cook.

Start by heating enough oil to coat the bottom of a large pan over medium heat. While you are waiting for the oil to heat up, smash and peel some garlic and throw it in the pan.


*Hint: Be careful not to burn the garlic, if they are getting too brown you can take them out and let them hang out for a bit like this.


While the garlic is heating up, it's time to tackle those baby 'chokes.

Peel off the hard outside layers.


You will be exposing the artichoke heart (the edible part!)


Now cut off about an inch from the top (the top is where the artichoke bulb comes to a point). That stuff isn't edible either.


Use a peeler or a paring knife (I used a paring knife) to shave off the rough part of the stem and about an inch from the end.


Looking back at the above photo, I'm realizing I probably should have peeled about one more layer off this artichoke. It should be less green/more white. I'm learning too!

Then split it down the middle.
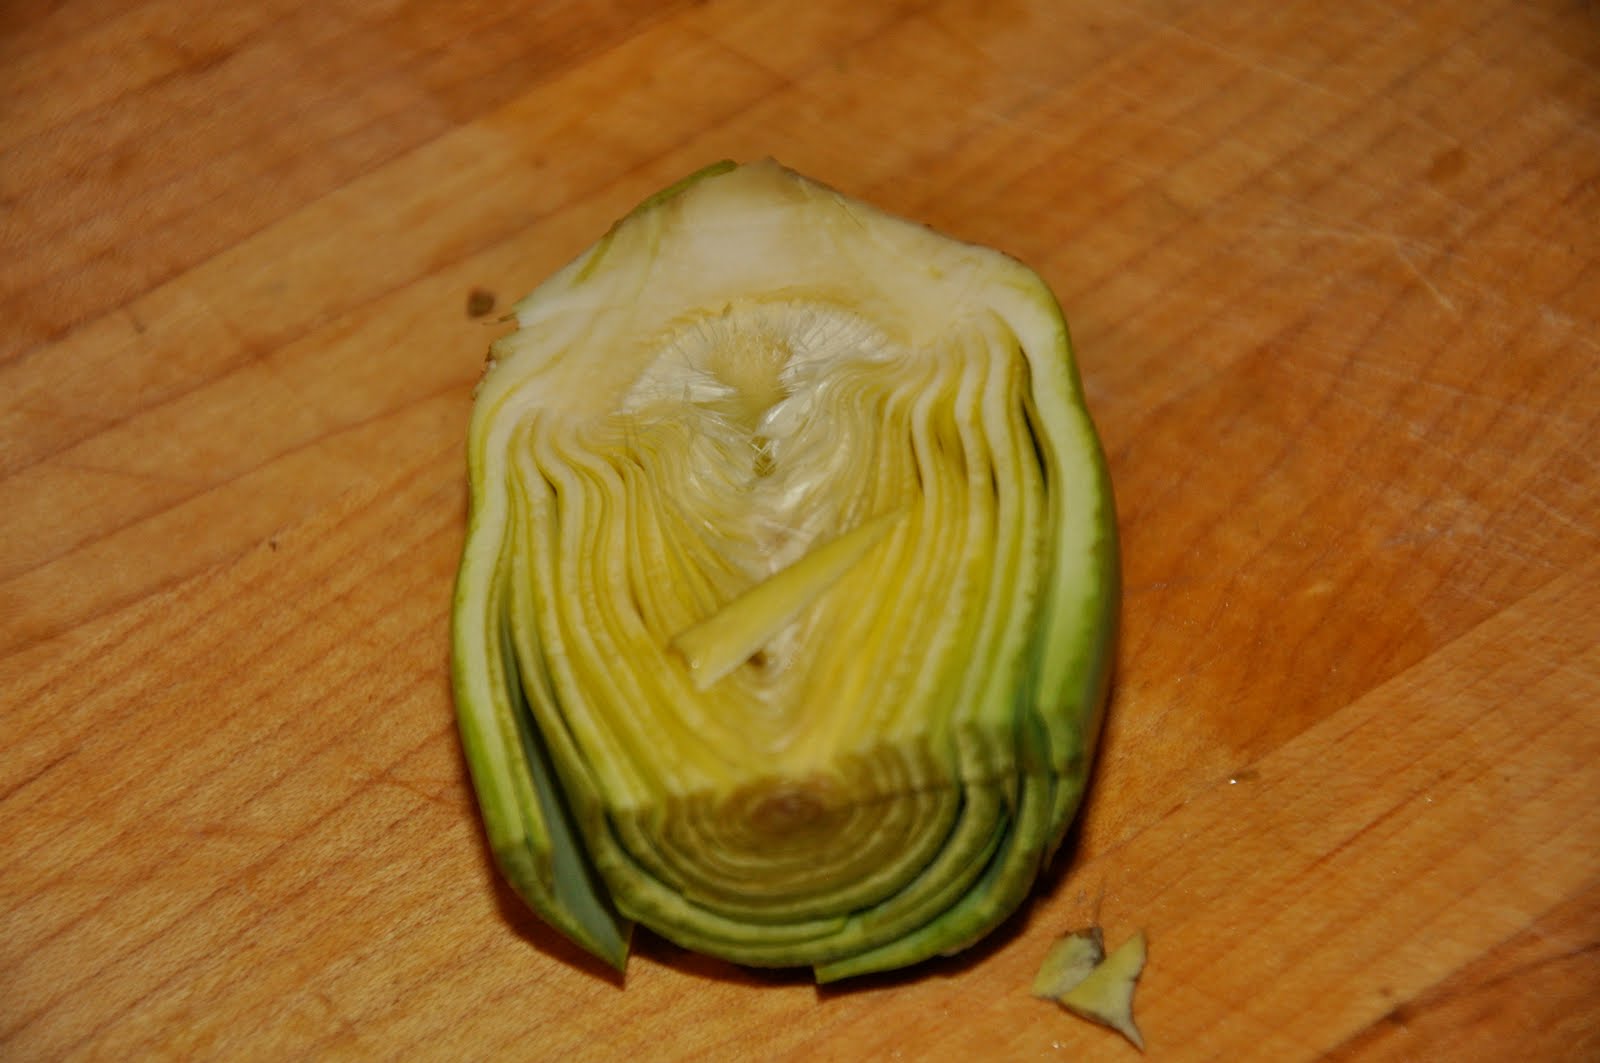


Toss them in the pan with the exposed layers facing down. You can peel, cut and place the 'chokes one at a time. This way the first ones you place will be done when you put the last ones in.

They're all in now...


Now you can start flipping them over if they're browned.


Once you flip them all over you can start tossing in the other "good" stuff, like the olives and tomatoes. This is an ideal time to put back that garlic if you took it out.


Now add a few pinches of salt (not too much because the olives are salty) and just a little bit of water.


Cover your pan and leave it be for 20 minutes.


While your waiting...Go ahead and boil some water in a different pot. Then toss in your shrimp, just until it turns pink, about 2-3 minutes. If they are even a little undercooked that's probably ideal because they will cook some more with the artichokes.


Strain them. Rinse them. Peel them (if they came unpeeled like mine).

After your artichokes and such have been cooking for about 15 minutes, go ahead and toss in your shrimp, put the lid back on and let everything cook together for a few final minutes.


These last few minutes are a good time to chop or prepare your herbs. I used thyme, but I'm sure parsley would be nice too.


Then test your 'chokes for doneness with a fork, they should be quite tender.


Serve your shrimps and 'chokes for your folks (or friends or whoever), on a nice serving platter and garnish with your fresh herbs.


And remember....From start to finish this should take under 45 minutes...


So "Thyme is on your side..." Haha get it?

Friday, April 9, 2010

EastOver... Passover meets Easter Feast!

We are so lucky to have Kellie and Ali as neighbors. We take turns hosting dinner parties once or twice a week. They are the best dinner party guests and on nights when I commute to CT and come back exhausted, there is nothing better than going over to their place for a home-cooked meal and some "southern hospitality" (Kellie is from Georgia and lives up to my expectations and more of what a Southern hostess should be like!)

Last week was our turn and it just happened to be Easter Sunday/the second to last night of Passover.

I was brisket-ed out and wasn't feeling the usual Easter fare of lamb/ham. So I settled on this springy menu instead. :

-Thai Style Mussels


-Sweet Potato Encrusted Flounder over Greens and Mango with Creamy Garlic Lime Dressing


-Matzoh Brittle


If you just wanted a "taste" you can stop reading here. If you want to know how it's all done, read on....

Thai Style Mussels
I used this recipe from Allecipes.com.

I bought a 2 lb bag of mussels. Closed mussels are alive and good to go. If they are open just pinch them closed and count to 5. If the stay closed they're good. If not, toss them.

So easy. In a large pot with a top, just mix together:
-1/3 cup of fresh lime juice (2-3 limes)
-1/3 cup of white wine
-1 can of unsweetened coconut milk,
-1 1/2 T of thai red curry paste
-2 cloves of garlic
-1 T fish sauce
-1 T sugar


Bring to a boil. Then add mussels. Reduce heat just a bit and cover. In 5-8 minutes they should be open which means that they are done!


I must not have waited 5-8 minutes before taking this picture because the mussels aren't open yet. Clearly I am impatient.


Sweet Potato Encrusted Flounder over Greens and Mango with Creamy Garlic Lime Dressing

I had this dish at Little Moir's Food Shack, a strip mall gem in Jupiter, FL. It blew me away and I immediately scoured the internet for a similar recipe. Luckily was able to find this one on Epicurious which comes out almost exactly like the original dish.

Here is Little Moir's version:


Here is mine... How'd I do?


This isn't terribly difficult but has a lot of components so you have to stay organized. Also, I'd highly recommend grating the sweet potatoes using a food processor (if you don't have one, hopefully you have a fantastic roommate like mine who will lend a hand/an afternoon peeling and grating...Thank you Sarah!)

First assemble the salad. It's just greens, string beans (boiled in hot water, then "shocked" in cold water), and cubed mango.


Again, I was impatient and took the photo before adding the string beans...use your imagination?

Cubing mango is easy. Here's how you do it (I had to YouTube this myself)

Cut it like this...

Then flip it inside out like a porcupine and cut along the skin to release the cubes.


Next make the dressing. Just whisk together:
-1/2 cup mayo
-1 1/2 T sour cream
-1-2 T lime
-1 T lemon
-1 t sugar
-garlic paste


Next, make the fish...

I used flounder, but any fresh, flaky, white fish will do.

Heat a few tablespoons of oil in a large pan. Put a handful of grated sweet potatoes on the pan.

Make an "egg wash" by setting up 1 plate with flour and 1 plate with 2-3 lightly beaten eggs.

Dip fish in flour. Then dip in egg. Place fish atop your sweet potato pile in pan (the fish will stick to the sweet potato because of the egg). Then add another handful/layer of sweet potato on top of the fish. When sweet potato is golden on the bottom, flip the fish very carefully. Cook the other side until golden.

When both sides are golden and fish is cooked through, remove from pan, place atop greens and drizzle with dressing. Repeat with remaining pieces of fish.


Matzoh Brittle
Why are Passover desserts always so lame? Not this one....


I used this recipe from www.noshwithme.com

First preheat your oven to 375 degrees F. Then, bring 2 sticks of butter with 1 cup of brown sugar to a boil in a small saucepan. Watch it carefully so it doesn't burn.

Line a baking sheet with aluminum foil and spread out 3-4 sheets of matzoh on it.
Pour the brown sugar-butter mixture over the matzoh and bake for 7 minutes.

When you take it out the brown sugar-butter mixture should have formed a nice golden crackly layer over the matzoh. Quickly (white it's still hot!) pour a layer of chocolate chips all over the matzoh and allow to melt. You can get really snazzy and add sprinkles, coconut, slivered almonds and the like...unless of course you are a matzoh brittle purist like me.

Cool in the fridge for a few hours. (Or the freezer if you're impatient like me). Break into bite-sized pieces and enjoy!


And no EastOver can be complete without a little Easter "Peep Show." Yes, very mature...I know.

Tuesday, April 6, 2010

Day 5, Homework - Banana Blooper!


Homework


All good movies end with a blooper, so a good blog series should probably end with one too, right?

Out of fear of setting off my smoke alarm, I refrained from repeating any of the grilling techniques from class. Ironically enough, I nearly burned down my apartment, terrified my roommates and broke my camera all while trying to flambe a banana...

You HAVE to see this....

Richard Demonstrates How to Flambe a Banana


I really wish at the end he had said "don't try this at home, Sara."


Sara Demonstrates How NOT to Flambe a Banana


I give myself an F for technique, A+ for effort and entertainment value.

Outakes from Class!

I couldn't include all my photos from class on the blog but I didn't want them to just end up on the "cutting room floor," so I posted a public album on Facebook. Enjoy!


Salads from Class!

I took pretty copious notes in class and promised other class members I would share the ingredients for the 10 different vegetable salads we made on Day 5. Figured I'd post them on this blog as well while I'm at it!
Richard didn't provide exact measurements (I think he made them up as he went along) but at least the ingredients provide a good foundation for recreating the recipes.

1) Fennel and Cabbage Slaw with Horseradish-Dill Dressing


  • Red Cabbage
  • Red Onion
  • Green Apple
  • Fennel
  • Dill
  • Celery Seed
  • Horseradish Mayo

2) Guacamole


  • Avocado
  • Red Onion
  • Shallot
  • Tomato
  • Cilantro
  • Parsley
  • Scallions
  • Tabasco
  • Garlic

3) Roasted Califlower
w/ Roasted Red Pepper Mayo


  • salt
  • pepper
  • olive oil
  • cauliflower
Make X's on bottom to remove core of cauliflower. Rub with a little bit of olive oil salt and pepper. Roast at 350 degrees F for 45 minutes.

4) Potato Salad


  • Potatoes
  • Mushrooms
For the mayo:
  • Watercress
  • Garlic Paste
  • Mayo
  • Basil

5) Jicama Salad


  • Jicama
  • Parsley
  • Cilantro
  • Salt
  • Pepper
  • Lime Juice
  • Olive Oil
  • Jalapeno

6) Carrot and Raisin Salad with Raspberry Vinaigrette


  • Carrots
  • Raisin
  • Parsley
  • Toasted Almonds
  • Thyme
  • Fennel
  • Salt
  • Pepper
  • Raspberry Vinaigrette (olive oil, dijon mustard, raspberry vinegar, salt, pepper)
7) Celery Root Salad with Remolade


  • Celery root
  • Parsley
  • Chives
  • Tarragon
  • Remoulade (Mayonnaise with conichons, capers, herbs and anchovy paste)
8) Roasted Beet Salad


  • Roasted beets
  • Mint
  • Basil
  • Scallions
  • Sherry Vinaigrette (olive oil, dijon mustard, sherry vinegar, salt, pepper)

9
) Daikon Radish and Cucumber Salad


  • Daikon Radish
  • Cucumbers
  • Scallions
  • Julienned Ginger
  • Red Wine-Sesame Vinaigrette (sesame oil, dijon mustard, red wine vinegar, salt, pepper)

10) Roasted Red Peppers


Lost my notes on this! Besides the roasted red peppers... I'm guessing olive oil and herbs...perhaps tarragon? Anyone remember? Richard, are you out there? Help!

Techniques of Fine Cooking 1, Day 5

Apologies, apologies! I abandoned my blog temporarily just before posting from Day 5 of cooking class. But...I'm back!

After all the buttery french food, this menu was one of my favorites, much lighter and leaner, (I didn't go home feeling like I ate a brick).

Techniques learned:
Vegetable Salads
Sauce Mayonnaise and Variations
Grilling Techniques for Proteins and Vegetables
Flambeing Technique

Menu:
  • Grilled London Broil
  • Various Vegetable Salads
  • Flambeed Bananas with Ice Cream


Lexicon:

crudites
- vegetables

mayonnaise - emuslified sauce made with egg yolks, oil, mustard and lemon juice

marinade - acid that aids and abets tenderization

flambe - literally "to flame," use alcohol with a high percentage of alcohol then ignite to create "flaming" effect.

Top 5 Lessons I Learned Today:

1) Let your grill or grill pan heat up for a long time before using it. I love my grill pan but have been using it all wrong. It usually takes at least 30 minutes to heat up. In other words, if you live in a NYC apartment, your grill pan is ready when your kitchen is filled with smoke, your smoke detector is on the brink of going off and your roommates are cursing, coughing and frantically trying to prop a fan in the window for ventilation. I wish I were joking...this is how hot your grill pan should be before using it.

2) To make mayo add oil drip by drip to an egg/mustard/acid base. A cool trick is to put oil in a paper cup and then poke a small hole in the cup and hold it over your bowl with your egg/mustard/acid base. This frees up your hands a bit so you can whisk and control the oil flow at the same time.

3) Never oil a marinade. It won't allow the acid to penetrate the meat and when you go to grill the meat it will be really really smoky. (Use oil after you take the protein off of the heat.)

4) Avocado is a fruit! Refrigerate a ripe avacado. To faciliate ripening, put it in a paper bag or a closed space with an apple or pear.

5) When you flambe, 20% of the alcohol stays behind. Use rum, vodka, brandy or everclear.

Quote of the Day:
"There's nothing worse than touching yourself inappropriately and being reminded you just chopped a hot pepper."

Day 5 in Photos


To roast a red pepper let it char on an open flame until it is "96.7% black" (according to Richard). Put it into a container with a lid or paper bag to help sweat off the skin. Then use a paper towel (not water) to get off the char.


Sprinkle salt and pepper from high up to distribute more evenly


Marinating london broil....(should let marinade for 24 hours +)


Beautiful and seasonal vegetable salads!


Vegetarian nightmare!


The finished product... I didn't do such a good job "plating"... Richard says the rim of your plate should act like a picture frame... I say the rim of your plate should be used to hold more food when you are very hungry and your eyes are bigger than your stomach. Beauty is in the stomach of the beholder anyway.


Banana flambe!